Tampilkan postingan dengan label INSTANT POT. Tampilkan semua postingan

Instant Pot Butternut Squash SoupOnly 117 Calories Per Serving

Maret 15, 2018 0
This simple butternut squash soup is a
great first course for your holiday dinner.

Follow Foods For Long Life on Facebook and Pinterest.
For healthy, vegan holiday recipes, check out
my ebook, Health Begins in the Kitchen.

Quick and Easy Soup in the Instant Pot
With several dozen butternut squash from my harvest, I've been trying to create a really simple, delicious, and healthy recipe so that I can enjoy them over the next few months. This recipe, using my Instant Pot Pressure Cooker, makes a steamy, brothy soup that makes a wonderful beginning to any meal. I will be hauling a few of my squash to my daughter's house next week so that we can serve this soup on Thanksgiving day.

Butternut squash can sometimes be tough to cut and a bit intimidating, so check out my post, An Easy Way to Cut a Butternut Squash Without a Machete.

If you don't have an Instant Pot, follow the Stove Top recipe below.


                         *                                 *                                 *

Instant Pot Butternut Squash Soup
Vegan, Dairy and Gluten Free
[makes 6 servings]

Requirements
Instant Pot Pressure Cooker
Immersion Blender

Ingredients
1 tablespoon extra virgin olive oil
1 cup diced onion
1 cup diced celery
1 (2-pound) butternut squash, peeled, cleaned and diced
4 cups vegetable broth*
1/2 teaspoon salt, or to taste
1/2 cup unsweetened applesauce, room temperature
Pinch cayenne pepper, or to taste
1 teaspoon fresh thyme, chopped, divided
2 tablespoons freshly squeezed lemon juice, or to taste

* broth can be replaced by 4 cups water and a large Rapunzel vegan bouillon cube

Directions (Using an Instant Pot)
Heat the oil in the Instant Pot on the SAUTE function. Add the onions and celery and cook for three minutes, stirring frequently. Turn off the Instant Pot.

Add the diced butternut squash, broth, and salt and hit the MANUAL button on the Instant Pot and set for 6 minutes under high pressure. Make sure the quick release switch in the closed position. When done, hit the OFF button and let the pressure release naturally.

When complete, open the cover and tilt so that the steam comes out the back and away from your face. 

Add the applesauce, cayenne pepper, and 3/4 teaspoon of thyme and, using an immersion blender, blend until smooth. 


Stir in the lemon juice and adjust salt and cayenne to taste. It should still be warm enough but if not, use the SAUTE function and heat for several minutes. 

Pour into large cups or small soup bowls, top with the remaining fresh thyme and serve. 

Directions (On the Stove Top)
Heat the oil in a soup pot on medium heat. Add the onions and celery and cook for several minutes, stirring frequently. 

Add the diced butternut squash, broth, and salt and bring to a boil. Lower the heat and simmer, covered, until the squash is soft, about 15 to 20 minutes.

Turn off the heat. Add the applesauce, cayenne pepper, and 3/4 teaspoon of thyme and, using an immersion blender, blend until smooth. 

Stir in the lemon juice and adjust salt and cayenne to taste.

Pour into large cups or small soup bowls, top with the remaining fresh thyme and serve.  

Nutrition
Per serving: 117 calories, 3 g total fat, 1 g saturated fat, 0 mg cholesterol, 58 mg omega-3 and 263 mg omega-6 fatty acids, 2 g protein, 23 g carbohydrates, 4 g dietary fiber, and 551 mg sodium.

How To Make Your Own Cough Syrup Avoid Dangerous Over-The-Counter Products

Maret 12, 2018 0
Over-the-counter cold remedies can be dangerous.
So try making your own!

Follow Foods For Long Life on Facebook and Pinterest.

What's In Your Cough Syrup?
You can tell that it's cold and flu season by the melodious sound of hacking coughs in the supermarket, airplanes, schools, and in the office. A cough can disrupt your sleep and leave you exhausted. 

Most people think that over-the-counter medications are pretty safe and when faced with a never-ending cough, are desperate to try anything. But like many pharmaceutical drugs, the side effects can be more dangerous than the symptoms you are trying to suppress. Especially when you take too much. And when you can't stop coughing, sometimes it's easy to take a bigger slug that what is prescribed.

Many cough syrups contain DMX, or Dextromethorphan. Side effects of taking too much DMX can include:
* Blurred vision
* Confusion
* Drowsiness or dizziness
* nausea or severe vomiting
* difficulty in urination
* shakiness and unsteady walking
* slowed breathing
* unusual excitement, nervousness, restlessness, or severe irritability

In addition, some children do not have the enzyme to metabolize this drug so this becomes an extremely dangerous remedy. Many teens use and abuse cough medicine containing DMX to get high which can be fatal. If you have young children in the house, it's a good idea not to have these types of medicines in the house.

OTC cough medicines may also contain other ingredients such as acetaminophen. Around 80,000 people a year end up in an emergency room for acetaminophen toxicity which can lead to severe liver damage.

Make Your Own
Once again, mother nature comes to the rescue. With a few simple ingredients, you can make your own cough syrup with real health benefits and no dangerous side effects. This syrup has these healthful ingredients:

Onions
Onions are in the allium family. For centuries, they have been used as a medicine. Egyptian physicians recommended the onion for literally thousands of separate ailments.  Rich in the antioxidant quercetin (and other flavonoids), they stimulate the immune system, protect against oxidative stress, and act as a natural decongestant. 

Garlic
Also in the allium family, garlic has been used throughout ancient history for its medicinal properties. Rich in the sulfur compound allicin, it bolsters the immune system and is a potent antibiotic. It has antibacterial, anti fungal, and antiviral properties as well.

My garlic harvest.

Ginger
Although ginger is most notably used for nausea, it is a natural decongestant and antihistamine. It can warms the upper respiratory tract and is useful in treating symptoms of colds and flu.

Honey
Although many vegans avoid the use of honey in daily cuisine, it remains an important medicine due to its strong antimicrobial properties and wound healing abilities. These properties have been documented in the oldest medical literature. With respect to cough suppression, some believe it is as effective as dextromethorphan. It is also used to treat infections of the upper respiratory tract. 

             *                             *                           *            

Here's a simple recipe for the relief of chess congestion and coughing. I make this in very small batches since it is best when fresh. Store in the refrigerator and make a new batch ever two or three days.Take as much as you need to control your cough. No one has ever OD'd on onions and garlic but I wouldn't advise going on a first date. 

Homemade Cough Syrup
[makes ~ 3 to 4 tablespoons]

Allow 8 to 24 hours for extraction. You can use an Instant Pot, yogurt maker, or just a warm spot in your kitchen.

Ingredients
1 organic onion
1/2 teaspoon freshly grated organic garlic
1/2 teaspoon freshly grated organic ginger
1/4 cup raw honey

Directions
Peel the onion and cut in half vertically. Thinly slice the onion in half moons and place in a glass pint jar. 


Combine the garlic and ginger with the honey and pour over the onions. Mix well and push down so the honey is above the onion mixture.


Place the jar in your Instant Pot and hit the YOGURT setting. Cover with a regular lid and let sit until juice forms. If you don't have an Instant pot or yogurt maker, just cover the jar and place it in a warm spot in your kitchen. Either method will take 8 to 12 hours. If it doesn't get juicy enough, let it sit longer. 

Using a fine mesh strainer, strain the mixture into a small jar. Cover and refrigerate until needed. It tastes better than you'd think, even with the garlic and onions! 


I hope this recipe brings you some relief.

P.S. 
I hated to waste the onion mixture, so I rinsed off the honey (not necessary) and tossed it in my Instant Pot with some beans. Pretty yummy.


Mashed Vegan Yukon Gold Potatoes And Cauliflower Using Your Instant Pot Pressure Cooker

Maret 10, 2018 0
Add nutrients and fiber to your mashed potatoes.
This is my FAVORITE way to make mashed potatoes!

Follow Foods For Long Life on Facebook and Pinterest.

A Healthier Mashed Potato
Who doesn't love mashed potatoes? And there are plenty of tasty dairy-free products available like Earth Balance Buttery Spread and a number of vegan sour cream products that you can whip into your dish so that vegans and those allergic to dairy can enjoy them. But these products can add a lot of calories and not provide all that much nutritional benefit.

Adding cauliflower to your mashed potatoes, while limiting the amount of vegan margarine and sour cream, can not only reduce the calorie count but can also add fiber, protein, vitamin C, K, and B6, folate, pantothenic acid, magnesium and potassium. One large head of cauliflower has a whopping 17 grams of high quality protein and 21 grams of dietary fiber!

Instant Pot Pressure Cooker
This dish is quite easy to make in your Instant Pot Pressure Cooker. The only tricky thing is to determine the correct amount of water to add to the pot. I used one half cup and it was a bit dry so I'm suggesting 2/3 cup for this recipe. If it seems like it's too much, you can always drain some out (reserving the water just in case). Different potatoes will vary in the amount of water they absorb. This recipe calls for Yukon gold, my absolute favorite potato to mash.

If you don't have an Instant Pot Pressure cooker, just peel, dice, and cook your potatoes together with cauliflower florets in a 5-quart Dutch oven or medium pot. Since cauliflower cooks faster than potatoes, cut the potatoes up smaller than the cauliflower.

          *                  *                   *                      *

Mashed Yukon Gold Potatoes and Cauliflower
Vegan, Dairy Free, Gluten Free
[makes 8 servings]

Requires an Instant Pot Pressure Cooker

Ingredients
2 pounds Yukon gold potatoes
1 large head cauliflower (~ 1.5 pounds)
2/3 cup water
1 1/2 tablespoons nutritional yeast
1 tablespoon Earth Balance Buttery Spread
2 tablespoons Tofutti Better Than Sour Cream 
Salt and pepper to taste

Directions
Peel and dice the potatoes. Remove the large bottom leaves of the cauliflower. Cut into pieces using the stems and flowerets. Place potatoes and cauliflower in the pressure cooker along with the water.


Secure the pressure cooker top making sure that the quick release switch is in the closed position. Push the manual button and set it for 4 minutes at high pressure.

When it's done, hit the off button on the lower right and then do a quick release. Open the cover and tilt it so that the steam comes out the back away from your face.

There should be a small amount of cooking liquid on the bottom which you will mash into the potato-cauliflower mix. If you think it is excessive, drain some out but save the liquid just in case.

Place the nutritional yeast, Earth Balance, and vegan sour cream into the pot and mash everything together until it reaches the desired consistency. Season with salt and freshly ground black pepper to taste. If it seems too dry, add more Earth Balance, sour cream, or a bit of hot almond or soy milk or, if you drained out some cooking liquid, you can add that back in.


Serve immediately or place in a casserole dish and heat in the stove or microwave oven to reheat.

Nutrition
Per serving: 135 calories, 2 g total fat, 1 g saturated fat, 50 mg omega-3 and 48 mg omega-6 fatty acids*, 0 mg cholesterol, 6 g protein, 27 g carbohydrates, 5 g dietary fiber, and 65 mg sodium (plus whatever you added to taste).

*Fatty acid amounts do not include any contribution from Earth Balance, Tofutti Better Than Sour Cream, or nutritional yeast since the manufacturer does not provide that information.


Instant Pot Black-Eyed Or Yellow-Eyed Peas With Corn And Greens

Maret 09, 2018 0
Easy One-Pot New Year's Day Recipe for Good Luck.

Follow Foods For Long Life on Facebook and Pinterest

Happy New Year
It wouldn't be New Year's without a lucky black-eyed pea recipe. This year's recipe is as simple as it gets and is made in an Instant Pot Electric Pressure Cooker. 

I have a confession to make. This year I'm taking a big risk and making yellow-eyed peas from Rancho Gordo but of course you can make this with traditional black-eyed peas.


        *                           *                        *                     *

Black-Eyed (or Yellow-Eyed) Peas with Corn and Greens
Vegan, Gluten and Dairy Free
[makes 6 servings]

Requires an Instant Pot Electric Pressure Cooker
Allow soaking time - either overnight or 2 hours in hot water.

Ingredients
1 cup black or yellow-eyed peas
2 1/2 cups rich broth (or hot water and a Rapunzel vegan bouillon cube)
1 cup diced onions
1 cup diced celery
1 cup frozen corn
1/2 teaspoon black pepper
3 cloves minced or pressed garlic
4 cups packed sliced kale or other greens
1 teaspoon extra virgin olive oil
Salt to taste

Directions
Examine the peas for rocks or dirt and then rinse well. You can either soak them overnight or place them in the Instant Pot covered with water (2 inches over the peas) and bring to a boil using the saute button. Let the peas boil for a few minutes, then cover and let sit in the hot water for 2 hours.

After they are soaked properly, rinse with fresh water. Place the peas back in the Instant Pot with the broth or a Rapunzel bouillon cube dissolved in hot water. 

Add the onions, celery, corn, black pepper and garlic and stir. Place the greens on top and drizzle the oil over the entire mixture.

Secure the pressure cooker top making sure that the quick release switch is in the closed position. Push the manual button and set for 3 minutes at high pressure.

When it's done, hit the off button on the lower right and let the pressure come down naturally. When complete, open the cover and tilt so that the steam comes out the back and away from your face.

Add salt to taste and adjust the seasoning. If you used the bouillon cube, it will already have some salt so taste the broth first.

Serve over rice, quinoa, or pasta or just enjoy as is as a brothy stew.

Happy New Year and may 2016 bring you lots of luck, joy, and good health!
Joanne


Cannellini Beans With Roasted Butternut SquashInstant Pot And Stove Top Recipes

Maret 08, 2018 0
Roasted butternut squash adds a natural sweetness to this dish.

Follow Foods For Long Life on Pinterest and Facebook.

Beans for Fiber, Protein and More
For those of you who have vowed to eat less meat this year, you will be happy to know that you can get lots of high quality protein from beans. Unlike with meat, this protein comes with critical dietary fiber, antioxidants, and complex carbohydrates that will stabilize your blood sugar and help lower your cholesterol. The best part about this protein source is that it doesn't come with saturated fat and cholesterol. So add some to your diet each day.

Winter Squash
I had a wonderful winter squash harvest this year so I'm looking for recipes to use them up. Last week, my friend Margarite brought over some cannellini beans with roasted butternut squash. The roasted squash gave the beans a beautiful sweet flavor. Here's my attempt to duplicate this lovely recipe. You can make the beans in an Instant Pot or just cook them on the stove, but always start with dry beans. I don't think canned beans would taste as good.

Some of my winter squash harvest.
           
    *                       *                       *                     *

Cannellini Beans with Roasted Butternut Squash
Vegan, Dairy Free, Gluten Free
[makes 6 servings]

Beans can be made in an Instant Pot or on the stovetop.

Allow time to soak beans overnight.

Ingredients
1 1/2 cups dry cannellini beans 
Water for soaking
4 cups rich vegetable stock
1 medium onion, diced
3 cloves of garlic, peeled and sliced
1 bay leaf
1 1/2 pound butternut squash
2 tablespoons extra virgin olive oil
1 teaspoon salt
1/2 teaspoon pepper
1/2 teaspoon garlic powder
1 teaspoon dried rosemary
1 tablespoon freshly squeezed lemon juice or splash of vinegar (optional)

Directions
Pick through the cannellini beans for rocks and rinse well. Place in a pot, cover with 2 inches of water, and soak overnight.  If you forgot to soak the beans overnight you can place them in a pot with 2 inches of water, bring to a boil on medium heat, turn off the heat, and let the beans sit in the pot, covered, until the water cools down. One and a half cups of dry beans should plump up to about 3 1/2 to 3 3/4 cups of soaked beans.

Rinse the soaked beans well. If you are cooking them on the stovetop, place the beans in a large pot or 5-quart Dutch oven with the stock, onion, garlic, and bay leaf. Cook until tender. You may need to add more broth if it cooks down.

If you are using an Instant pot pressure cooker, place the soaked and rinsed beans in the pot along with the stock, onion, garlic and bay leaf. Hit the manual button and set for 6 minutes under high pressure. Make sure the quick release switch is in the closed position. 


When it's done, hit the off button and let the pressure come down naturally. When complete, open the cover and tilt so that the steam comes out the back and away from your face. Test for doneness. 

Preheat the oven to 400 degrees F.

While the beans are cooking, clean the squash. Check out my post on An Easy Way to Cut a Butternut Squash. Dice the squash and place in a bowl with the olive oil, salt, pepper, garlic powder and dried rosemary. Toss until well coated and spread out on a non-stick shallow baking pan or one lined with a Silpat silicon mat. Roast in the oven for 30 to 40 minutes, stirring halfway through, until cooked and slightly golden brown.

You may notice that I have heavily seasoned the squash. Once cooked, the squash will be used to season the beans so don't skimp on the salt and other seasonings.

Before baking
After roasting

Remove the roasted squash from the oven and set aside.

After the beans are cooked (using either method), stir the cooked squash into the beans. Simmer the squash and beans together so that their flavors melt together. If on the cooktop, simmer on low for 15 to 20 minutes. If in the instant pot, you can either hit saute for 10 minutes or slow cook for 30 minutes. 


Taste for seasoning and adjust if necessary. Stir in lemon juice or vinegar, if desired. 

Serve immediately over rice, quinoa, or your favorite grain or pasta, or refrigerate. They will thicken and become even more flavorful the next day. This is a good dish to make on Sunday and serve a few times during the week.

Cannellini beans with roasted butternut squash
served over GABA sprouted brown rice.

Nutritional Information
Per Serving: 261 calories, 7 g total fat, 1 g saturated fat, 151 mg omega-3 and 769 mg omega-6 essential fatty acids, 10 g protein, 41 g carbohydrates, 9 g dietary fiber, and 399 mg sodium.


Instant Pot Garlicky Mashed Cauliflower Vegan And Paleo FriendlySuper Low Calorie!

Januari 17, 2018 0
Use mashed cauliflower as a tasty side or a bed for a stew.

Follow Foods For Long Life on Pinterest and Facebook.

Mashed Potato Substitute
I adore mashed potatoes but nutritionally they can't compare to cauliflower. When you properly prepare and mash cauliflower, you really can't tell the difference. And with cauliflower, you get a lower calorie and carb substitute with the cancer-fighting benefits of a cruciferous vegetable. Cauliflower is also super rich in antioxidants, and a great source of dietary fiber, vitamin C, K, B6, folate, pantothenic acid, potassium, and manganese. 

Today's recipe also replaces the typical butter and cream in mashed potatoes with the heart-healthy, mono-saturated fat of an avocado. OK, it turns the mash a tiny bit green, but it makes them super creamy, and adds more dietary fiber, vitamin K and folate. For an added burst of goodness, this recipe flavors the mash with fresh garlic!

               *                                    *                                       *

Garlicky Mashed Cauliflower
Vegan, Paleo, Dairy and Gluten Free
[makes 4 to 6 servings]

Requirements
Instant Pot 
Food Processor 

Ingredients
1 tablespoon olive oil
2 cloves garlic, minced
1 large head cauliflower, cut into florets
1/2 cup water 
1/2 teaspoon salt, or to taste
1/4 teaspoon pepper, or to taste
1/3 avocado, room temperature

Directions
Heat the oil in the Instant Pot using the SAUTE function. Add the garlic and cook until slightly brown. 


Press the OFF button and immediately add the cauliflower florets, then the water, salt, and pepper. 


Secure the lid, press the MANUAL button and set for 4 minutes. When done, press the OFF button and quickly release the pressure. Carefully remove the lid.

Drain and reserve any remaining liquid from the pot. 

Place the drained cauliflower into the food processor. Add the avocado and process until smooth. If it is too dry, add a tiny bit of the reserved liquid at a time. Do not add too much liquid or it will be too soft. 


Serve as a side vegetable or as a bed for stew, peas, tomato sauce, etc..


Serve as a side dish

Or serve as a bed for stews and sauces.

Nutrition
Per serving (4): 104 calories, 5 g total fat, 1 g saturated fat, 0 mg cholesterol, 116 mg omega-3 and 548 mg omega-6 fatty acids, 4 g protein, 13 g carbohydrates, 6 g dietary fiber, and 355 mg sodium.

Per serving (6): 69 calories, 4 g total fat, 0.5 g saturated fat, 0 mg cholesterol, 78 mg omega-3 and 365 mg omega-6 fatty acids, 3 g protein, 8 g carbohydrates, 4 g dietary fiber, and 237 mg sodium.

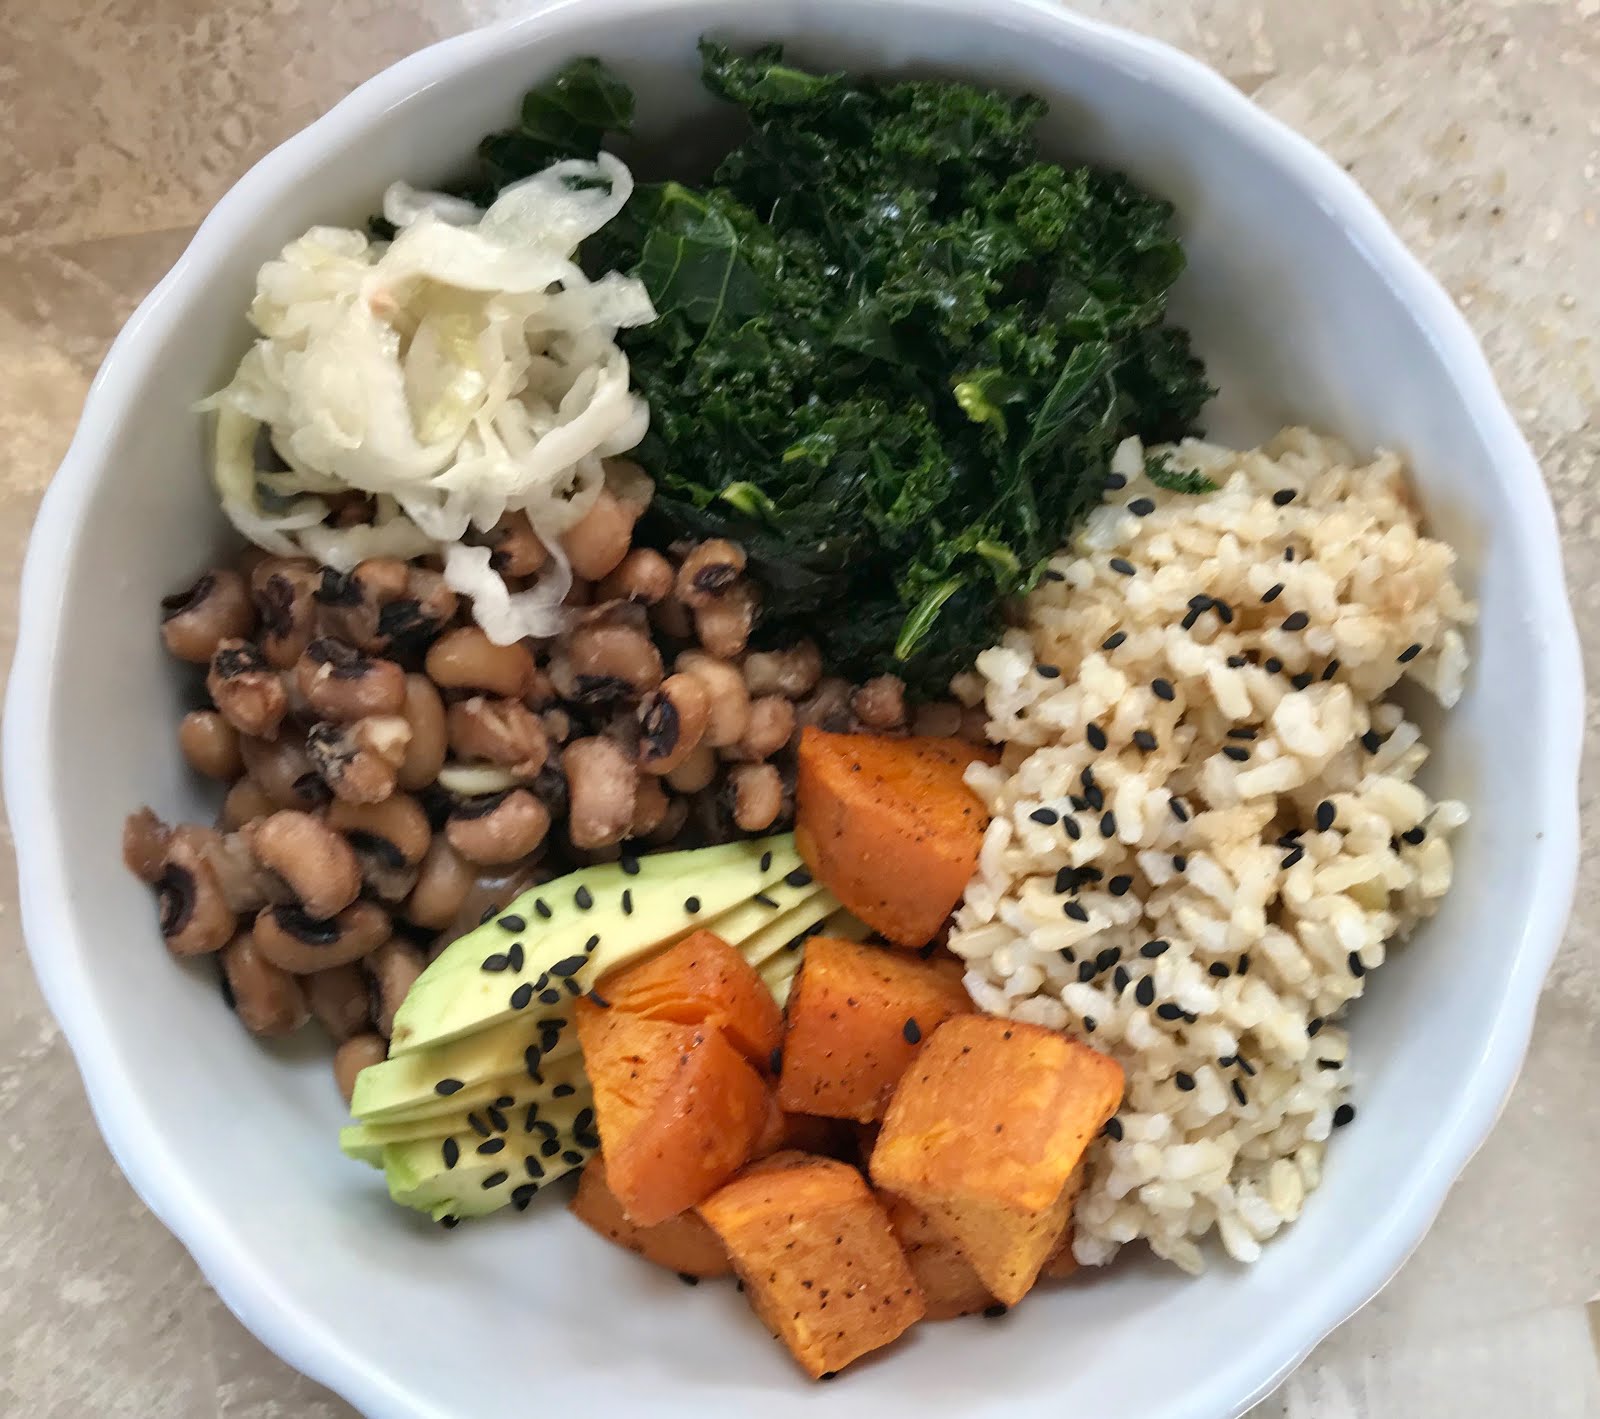
Lucky Black-Eyed Pea Macro BowlStart The New Year Off RightHow To Construct A Macro Bowl

Januari 01, 2018 0
Eat Black Eyed Peas on New Year's Day for good luck!

Follow Foods For Long Life on Facebook and Pinterest.

My Annual Black-Eyed Pea Recipe
I learned, when living in Texas, that eating black-eyed peas on New Year's day brings good luck. Sometimes it works, sometimes it doesn't - but I don't dare start the year without them, just in case. To make sure I didn't mess with tradition, my daughter even sent me a pound of these lucky charms from Minneapolis for Christmas. 

I must admit, black-eyed peas aren't my favorite food so it's even more challenging to come up with a yummy recipe every year. But this year, I'm very excited about this macro bowl - especially because it's complemented with a tasty tahini sauce.

This recipe is a bit complicated as I use my Instant Pot for the kale and black-eyed peas, the oven to roast the potatoes, and my rice cooker to prepare the GABA rice. But it's all worth it in the end and, after all, it's New Year's day!

Constructing a Macro Bowl     
Macro bowls are very versatile and extremely healthy as they include a nice variety of foods. Here's how I construct mine:

#1 Protein  
For your protein, you can use any bean, tofu, tempeh, even shrimp or salmon.

#2 Greens
Steam kale, chard, spinach, mustard or other greens.

#3 Root Vegetables
Roast carrots, parsnips, sweet potatoes, new potatoes, turnips, or any other root vegetable. Just dice, toss with a little oil, sprinkle with salt, pepper, and granulated garlic, and bake for 30 to 40 minutes until cooked and brown.

#4 Grain
Use white, black, brown, or GABA rice, millet, quinoa, farro (not gluten free), or any of your favorite grains. 

#5 Avocado
Avocados make everything taste better. 

#6 Seaweed or a Fermented Vegetable
I usually put some raw sauerkraut or seaweed salad on my macro bowls, whichever I happen to have in the house. It's always good to have a fermented food as part of your meal. Your microbiome will thank you.

#7 A Yummy Sauce
Top your macro bowl with your favorite sauce. Today I made a tahini sauce but any of your favorite sauces will do.

#8 Seeds
Sprinkle your macro bowl with hemp, black or white sesame, pumpkin, or sunflower seeds for added nutrients.

When plating your macro bowl, be aware of the colors of the ingredients and place them to optimize the contrast. 

                     *                            *                             *

Black-Eyed Pea Macro Bowl
Vegan, Gluten and Dairy Free

Ingredients PER PERSON
1/2 cup cooked black-eyed peas
1 cup steamed kale
1/2 sweet potato, diced and roasted
1/3 - 1/2 cup cooked rice or other grain
1/4 avocado, sliced
Small serving of raw sauerkraut or seaweed salad
Teaspoon of black sesame seeds

For the sauce (4 servings, ~ 1/2 cup)
2 tablespoons raw tahini
1 tablespoon cold-pressed hemp oil
1 tablespoon soy sauce
1 tablespoon agave or honey
1 tablespoon fresh lime or lemon juice
1 large garlic clove, pressed
1 inch fresh ginger, peeled and grated
Pinch cayenne
1 tablespoon water

Directions
Cook the black-eyed peas on the stovetop according to package directions. Or use canned black-eyed peas.
To cook in your Instant Pot, place unsoaked dry peas in the instant pot with a bay leaf, some onion and celery, and cover with at least two inches of water. Set Manual to 6 minutes. When done, let pressure come down naturally. Move them to a covered dish to keep warm. If using your Instant Pot to make the greens, rinse out the Instant Pot.

Black-eyed peas take 6 to 7 minutes in the Instant Pot. Cover with enough water as they will swell.

Clean kale, remove stems, and thinly slice. Steam kale on stovetop until tender. To cook in your Instant Pot, place in the pot with 1/4 cup of water, a touch of salt, and 1 teaspoon of extra virgin olive oil. Set Manual to 3 minutes. When done, release pressure and remove.

To roast the sweet potatoes, preheat oven to 425 degrees F. Place small diced potatoes in a shallow roasting pan (I like to line the pan with a silicon baking sheet). Drizzle with a tablespoon or two of olive oil, sprinkle with salt, pepper, and granulated garlic to taste and mix well. Roast for 30 to 40 minutes, stirring half way through.

Cook rice in your rice cooker, or on the stovetop, according to directions. I used GABA rice because my daughter gave me a beautiful GABA rice cooker a few years ago and it cooks any kind of rice to perfection, but any type of rice or grain will do.

Make the sauce: Place the tahini in a small bowl and slowly stir in the remaining ingredients until well combined. 

Use fresh limes or lemons

Build the bowl: Get a good size shallow bowl. Place the cooked greens in the bowl. Next, the rice, then the roasted sweet potatoes, then the seaweed salad, avocado, and black eyed peas. Sprinkle with black sesame seeds and serve with the tahini dressing.

If you use sauerkraut instead of the seaweed salad, place that near the peas.


Happy New Year!
May you enjoy outrageous health and happiness in 2018!


Instant Pot Cauliflower SoupVegan And Gluten Free

Desember 08, 2017 0
This low calorie soup is excellent for weight loss.

Follow Foods For Long Life on Facebook and Pinterest.

Weight Loss Between the Holidays
I'm probably not alone at wanting to shed the Thanksgiving pounds before the next wave of holidays. I've always been a proponent of healthy soups for making this happen. Here's a easy and delicious soup that is less than 150 calories per hearty serving and also has 6 grams of dietary fiber.

Cauliflower is a cruciferous vegetable which contains the phytochemical sulforaphane. This compound has potent antioxidant and anti-inflammatory properties which contribute to its ability to prevent and treat several types of cancer. Inflammation also contributes to many long-term chronic diseases, such as cardiovascular disease, arthritis, and more.

The high fiber content of cauliflower not only helps keep you full, contributing to weight loss, but also helps lower cholesterol, control blood sugar, helps feed your gut bacteria, reduces the risk of colorectal cancer, and keeps you regular. 

Instead of using cream, this soup gets its creamy texture from potatoes allowing it to be dairy and cholesterol free.


    *                                   *                                *

Instant Pot Cauliflower Soup
Vegan, Dairy and Gluten Free
[makes 6 servings]

Requirements
Hand Held Immersion Blender 
Instant Pot

Ingredients
2 teaspoons extra virgin olive oil
1 onion, diced
2 stalks celery, diced
1 large head cauliflower, leaves removed, cut into florets
1 1/2 pounds Yukon gold potatoes, peeled and diced
4 cups vegetable broth*
1 bay leaf
1 teaspoon salt, or to taste
1/4 teaspoon black pepper, or to taste
Pinch cayenne pepper
2 tablespoon freshly squeezed lemon juice
*5 cups for stovetop recipe

Directions
Heat the oil in the Instant Pot by pressing the “Sauté” button. Add the onion and celery and cook until they soften, stirring frequently, about 3 to 4 minutes. Press the “Off” button.

Add the cauliflower, potatoes, 4 cups of broth, bay leaf, salt, black and cayenne pepper to the Instant Pot. Secure the lid, press the “Manual” button, and set for 4 minutes at high pressure. When done, quickly release the pressure and remove the lid carefully with the steam pointed towards the back. 

(To cook on the stovetop, heat the oil in a soup pot and sauté the onion and celery for several minutes. Add the cauliflower and potatoes, 5 cups of broth, the bay leaf, salt, black and cayenne pepper. Cook on a low boil, partially covered, until the vegetables are tender, about 15 to 20 minutes. Continue with the recipe.)

Remove a cup or more of the cooked vegetables, roughly chop and set aside. 

Remove the bay leaf and add the lemon juice. Using an immersion blender, blend the remaining soup until smooth. You can also do this in a blender but take care not to over process.

For a chunky soup, remove some of the cooked vegetables before you blend the soup and put them back in after blending. Skip this step for a completely blended soup.
An immersion blender makes blending a lot easier.

Stir in the chopped vegetables, adjust seasoning if needed,  and serve. 

Nutritional Information:
Per serving (6): 149 calories, 2 g total fat, 0 g saturated fat, 60 mg omega-3 and 219 g omega-6 fatty acids, 0 mg cholesterol, 6 g protein, 30 g carbohydrates, 6 g dietary fiber, and 438 mg sodium.